TRICK TO INSTALL AND RUN ANDROID OS ON YOUR PC


Android is Running on Mobile phone , teblet . Its a best apps for mobile phone and now you can Install and Run Android OS on your PC , Its a open Source Application to use on Mobile and your PC . You can Boot your computer Directely on with on Android OS with the help of  Pendrive or Memory card .

* First You have to Download Android-x86 on your PC .

 *Now You have to Download UnetBootin on your PC . Now choose Operating System on which you have to Download .

* Now Insert Your USB Flash Drive or Memory Card on PC .

* Now Run Downloaded UNetBootin , then go to DiskImage option then Browse for Android Downloaded ISO file .
 

*Now on the Type option Select USB Drive and then Select Flash Drive Letter D:\ , and then Click on OK

*Now Android is getting Install on Flash Drive which you have Inserted . After Complete installation Click on Reboot Now .
*Now Press F9 at the time of Reboot and Select on First Boot device option Boot From USB Flash Drive .
 
*After Booting with USB Flash drive Select Live CD- Run Android without Installation .

Now you have succesfully Install Android OS on your PC

AIRCEL JULY 2013 3G HACK

 AIRCEL JULY 2013 3G HACK

This is as usual proxy trick you just have to change the proxy setting in your mobile to use this tricks. Don't get fansy about this trick working or not as this works in NCR. My thinking you should check in your area. Tell us about your whether it works in your region or not. I m giving you lots of proxy try all to check which one is working.


Most of these highspeed proxies, 3G supported and also working in android smartphone. If you find in problem in settings or any problems. Feel free to post your queries please don't post any links of ur site.

How this tricks works :-

Change your Mobile Configuration Setting as :-

Configuration Setting Name : aahce blogs
Access Point : aircelweb
Homepage : www.google.com
Port : 8080
Proxy : Use any one which works in your region

99.567.67.87
      or
103.15.227.45
      or
10.4.42.15
      or
100.83.78.45

MICROMAX CANVAS 4 REVIEW


                                    MICROMAX CANVAS 4


Following the success of its Canvas 2 and Canvas HD smartphones, Micromax has been able to establish itself in the Indian smartphone space as a player that offers the best value for its customers' money. While the company's two best selling smartphones brought a large screen and a 720p screen, respectively, at a crowd pleasing price, it now wants to leverage its Canvas sub-brand further by offering niche products while continuing to expand its portfolio of flagship devices.

For its new flagship, the Micromax Canvas 4 (A210), the company created a lot of buzz, right from the promo teasers on TV during the high profile India vs. Pakistan clash in the ICC Champions Trophy to taking pre-orders for the phone without announcing its specifications. The Canvas 4 promises better build quality and new smart features but     essentially builds on the Canvas HD, and includes almost the same hardware, under the hood. Does the phone live up to the hype around it? We try to answer this question in our review.

Build/ Design


 On closer inspection you'll find that the phone looks a bit more polished than its predecessors, though it's still a little bit plasticky for our taste. The phone is available in White and Grey colour variants and we had a White Canvas 4 as our review unit.

Canvas4-blackandwhite.jpgThe front of the phone is dominated by the 5-inch display, below which you'll find the three capacitive touch keys for Menu, Home and Back. A chrome grill that serves as the earpiece, the sensor array and the 5-megapixel front camera are placed above the display. The bezel is wide but it's not flat as it meets and the edges and there's some embossing, similar to the Galaxy SIII.

The phone is surrounded by an aluminium frame in the middle, which gives it a premium look and makes it feel sturdy. The company says that it also acts as the cellular antenna. You will also notice that the frame has small white bands at the left side, at the bottom and at the top.
The Power/ Screen-lock key is located at the right side of the phone, while the Volume rocker key is place at the left side. Both these keys are also made of metal but are a bit rickety as they are not firmly fixed. When you shake the phone, you'll also hear some sound coming from the same area due to their movement. The Micro-USB port is located at the bottom. The 3.5mm headset jack sits at the top of the phone.
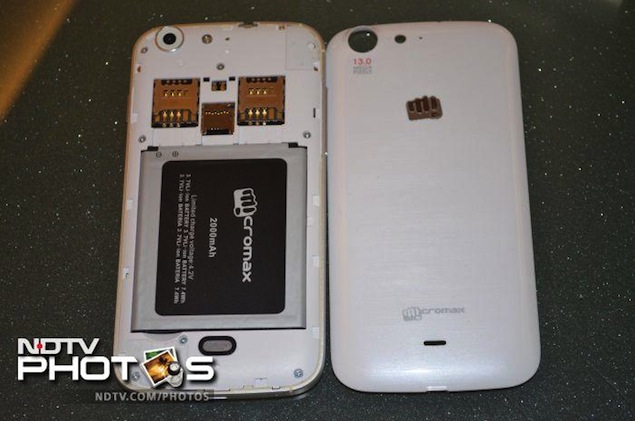
The back features a removable plastic cover that sports a glossy finish but there's a mild texture effect as well, which you'll only see when you look closely. There's some Micromax branding at the lower part, and a silver sticker like m! logo as you go up. The 13-megapixel rear camera is located right at the top in a round chrome ring enclosure, along with an LED flash and a secondary microphone.

Opening the cover reveals the battery compartment. The microSD card slot and two SIM card slots are placed just above the battery compartment.

Display


While everyone was hoping that the Canvas 4 would come with a full-HD display, Micromax has decided to skip the upgrade and has included a 720p display, similar to that of the Canvas HD. The phone's 5-inch HD IPS screen sports a resolution of 720x1280 pixels and a colour depth of 16.7 million. Thanks to the higher resolution, text, icons and images look much sharper compared to qHD phones. There was no pixelation. However, we felt that the screen's colour temperature was skewed towards the colder side, with whites carrying a blue tinge.


canvas-4-horizontal.jpgUnder sun visibility was good, though the screen is very reflective. Thanks to the IPS panel, we found that the viewing angles were very good, which essentially means that more than one person can view content playing on the screen properly, even from different angles. We also found the touch response of the screen to be better than most budget phones. Micromax has also included Corning Gorilla glass protection to guard the screen from scratches.

Software/ Interface


The Micromax Canvas 4 runs Android 4.2.1 Jelly Bean, the latest iteration of the OS. Micromax has skinned some elements of the user interface, such as the app icons and the Settings menu.

The phone also offers four themes, namely Mint, Mocha, Raspberry and the default theme that bring minor changes in the phone's colour scheme.

canvas4-UI-1.jpg The notification tray features a settings shortcut and a clear all notifications button, along with expandable notifications (expanded with the two-finger pull gesture). It features the same setting toggles shortcut that's found in stock Android and adds some of its own as well, for quick access to Airplane Mode, Battery status, Wi-Fi, Bluetooth, GPS, Data connection, Data usage, User (audio) Profiles, Brightness, Screen backlight timeout and Auto rotation.

Similar to most other Android devices, there are five customisable home screens that can be filled with app shortcuts and widgets. The three capacitive buttons, Home, Menu and Back help in navigating through the phone, with the Home button also doubling up as an app switcher on long press.


canvas4-UI-2.jpgYou also get lock-screen widgets, an Android 4.2 feature. You can choose from the Clock, Camera, Gmail, Google Now and Messaging widgets in addition to widgets offered by third-party apps installed on your phone. These widgets offer glanceable information from the apps and allow users to perform certain app actions even when the phone is locked.

The phone also offers another Android 4.2 feature, Daydream, that displays photo albums or the clock while the phone's charging. The option to wirelessly mirror the phone's display with an HDMI enabled device through a wireless display adapter is also present.

Micromax has also added some software tricks to the phone, one of which is a new lock screen mechanism that allows the phone to be unlocked with a blow of air or if the phone is shaken. This can be activated through the M! Unlock app that has been developed in partnership with FoneClay. It works as promised but disables the lock screen widgets, so we just feel it's too gimmicky.


canvas4-UI-3.jpgMicromax has also bundled a new Video Player app with the phone that offers features like 'Pause on look away' using the front camera to detect if you're looking at the screen of the phone, and automatically pausing and resuming videos. We've seen this feature in high-end phones like the Samsung Galaxy S4 and the LG Optimus G Pro. You can increase and decrease the volume or brightness while playing a video by just swiping up and down the screen at the left and right hand sides. It also allows you to preview one video while playing another one, and view videos on a floating player window while doing other tasks through its pop-out feature.

The Music player has also been revamped and now features fancier controls in the Now Playing screen and integrates the Micromax Online music store. The Music Store is still a website wrapped into the app and allows you to download music tracks and videos. It only lets you download tracks when you access the site through 3G/ Edge as billing is integrated with the telecom operator. The Music Player app also features Equalizer settings.


canvas4-UI-4.jpgMicromax has also included some of its own apps including content stores, M! Live and Game Hub, and services store, M! Zone, in addition to a few 'try and buy' games (Fruit Devil, NFS Shift, The DarkMan). There's also security software powered by NQ Mobile that allows you to backup contacts, and track your mobile in case you lose it. However, even this utility is not free and you need to pay additional charges to get all the functionality.

The handset also offers FM Radio and FM radio recording.

Micromax has also modified the Messages app, adding a Smileys input option next to the text entry prompt, and a button for attaching multimedia, contacts and audio clips, among others, with it. Micromax has also added a file manager app, a NoteBook app, a ToDo app, in addition to a universal search app and a Popup Browser that can be used for browsing the web in a floating window while working on another app. It has also replaced the stock camera app with a different one.

For the first time Micromax has replaced its own instant messaging app, HookUp with a Micromax branded version of Hike, the mobile messaging app from Bharti Softbank. It has also pre-installed the movie streaming app Spuul, that allows users to watch movies for free.

It's also worth pointing out that the Canvas 4 is the first Micromax smartphone that supports over the air software updates via a System Software app. Previously one had to take the phone to the service centre to get the latest Android update installed.

The phone also offers gestures like flip to silent, ability to answer the phone by bringing it near to the ear, and dial the number on the screen when the user brings the phone near the face.

Camera

The Micromax Canvas 4 has a 13-megapixel rear camera and a 5-megapixel front facing camera. Both the camera lenses are an upgrade from the Canvas HD's 8-megapixel rear shooter and VGA front facing camera.


canvas4-camerasmaple-1.jpgAs we mentioned earlier, Micromax has put its own camera app. The app includes Normal, HDR, Face Beauty, Smile detection, Exposure compensation, Panorama, Photosphere(multi angle view) modes. It also offers a burst mode, letting users click up to 99 shots at once. The photo mode allows users to modify settings like Exposure, colour effect, ISO and white balance, among others. There's a self timer of up to 10 seconds as well.


canvas4-camerasmaple-2.jpgWe experienced a minor lag when we tried to focus on an object and press the shutter. We also noticed that there is minor delay between two consecutive camera shots in the continuous shot mode. This makes it hard to capture images quickly. The quality of the pictures taken during daylight was decent. However, photos taken indoors under artificial light were a bit grainy and at times looked different than the actual setting. The camera tends to soften the tone to a cooler shade.

The Canvas 4's camera also struggled when trying to capture images in low-light.


canvas4-camerasmaple-3.jpgThe camera is capable of recording full-HD video and takes good quality videos depending on the ambient light. However, it saves video clips in .3GP file format, which is an older file format.

The 5-megapixel front camera takes above average pictures, and can be used for video conferencing. We wish the phone had a dedicated camera button to help click a quick picture.

Performance


 The Micromax A210 Canvas 4 is powered by a 1.2GHz MediaTek MT6589 quad-core processor with 1GB RAM onboard, and PowerVR SGX544MP GPU. There is 16GB of internal storage, 10GB of which is available to the user.

With Android 4.2 Jelly Bean, the overall experience of navigation through the interface was impressive, thanks to Project Butter and the phone's quad-core processor. We did not experience any lag while launching apps, playing games, scrolling web pages or switching between apps. It is safe to say that performance wise, the Canvas 4 scores well. We were able to play games like Jetpack Joyride, Chimpact, Asphalt 7 and Shadow Gun without encountering any lag.

We were also able to play full-HD clips, with the phone supporting formats like .AVI, natively, though we experienced some issues with audio while playing an MKV format video. This was easily fixed by downloading a third-party video player. The speaker on the phone delivers average quality sound at high volume levels, but there's some muffle when the phone lies on its back, as the speaker grill is located on that side. The headphones that come with the phone offer average quality sound output. Call quality was good, during our testing process.

micromax-canvas-4-cover.jpgThe phone comes with a 2,000mAh battery, and based on our experience, it will just about last you a full day. We charged the phone in the morning (at around 10am), and with medium to heavy usage, including 1-1.5 hours of phone calls, two e-mail accounts with push notifications, screen at maximum brightness, playing some music and video clips (about an hour), casual web browsing, Twitter notifications and WhatsApp chats, the phone lasted 8-9 hours. We had put the phone on Wi-Fi for about an hour or two while the rest of the day it was connected to data via 3G. We had turned off auto-brightness, and the phone was on the highest level of brightness. Altering these settings might help in running the phone for a longer duration, depending on your usage pattern.

Verdict


The Canvas 4 is at best an incremental upgrade to the Canvas HD. Apart from the 'better camera' which we didn't find any better and slightly improved build quality, it doesn't bring anything extra ordinary to the table. The software features that it offers are gimmicky and can be added with the help of some third party apps available on the Google Play Store. You are unlikely to use them on a regular basis. The only thing we're happy about is the increased internal storage capacity, which will allow users to install more apps.

The asking price of around Rs. 18,000 is on the higher side when you compare it to the Canvas HD or to phones like the Zen Ultrafone 701HD and Gionee Elife E3. We'd recommend waiting for a price cut or buying the Canvas HD if you're in the market for a good value for money Android smartphone.

Price: Rs. 17,990


Pros

    *Good screen
    *Decent performance

Cons

    *Questionable value for money
    *Underwhelming build quality
    *Camera performance could be better


Ratings (Out of 5) 
*Design: 3.5
*Display: 4
*Performance: 4
*Software: 4
*Battery Life: 3.5
*Value for Money: 3
*Camera: 3
*Overall: 3.5


TATA DOCOMO 2013 JULY 3G MOBILE HACK

 
Enjoy free 3G internet on Tata DOCOMo this July with this exclusive 3G trick.


Follow Below Instructions:-

Proxy:- 119.196.56.55 OR 119.172.78.83

Port:- 8080

Apn:- tata.docomo.internet

Homepage:- www.techgroovers.blogspot.com


Note:- Now Save The Settings, And Restart Your Mobile Phone.


Thanks for reading and comment over here if you face any problem...


VODAFONE JULY 2013 MOBILE 3G HACK

 
Hello Friends,

Surf free 3G internet on Vodafone. Enjoy!!!


Create new account in your mobile


Name--------   Vodafone

Apn --------- www or vlive

Port--------- 9401

Proxy----122.136.32.89, 125.178.215.213 , 75.61.37.99 , 174.189.123.124 ,102.175.151.203

Homepage:- www.google.com

D.N.S. address ----- 8.8.8.8 , 8.8.4.4


Now save & restart your mobile


Thanks for reading and comment over here if you face any problem....

RELIANCE JULY 2013 MOBILE 3G HACK


Here is the latest 3G Reliance trick, I hope you'll love it!!


Create new setting in your mobile

Name:- Reliance

APN:- rcomwap

Proxy:- 121.25.141.63 , 45.85.215.23 , 32.214.145.11
  
Port :- 80

Homepage :- flyproxy.com

Save and restart your mobile


Thanks for reading and please comment over here if you face any problem..

IDEA 3G HACK FOR MOBILE

 
This is the time for idea tricks most of the idea tricks bundled. Most of us want 3g tricks 4 highspeed downloading ,browsing. I m posting here the new working tricks for idea users. This is proxy tricks you have to make ur configuration setting in your mobile by following methods.

This is highspeed proxy tricks it works almost all regions. Prefer to use first proxy and use free homepage which ever works in your area. I m giving homepage 4 my region. After doing setting in your mobile. Switch off ur mobile for a while. Switch On. 

Change your Mobile Configuration Setting as Follows :-

Configuration Setting Name : aahce blogs
Acess Point : internet
Homepage : www.google.com
Port : 8080
Proxy : 453.28.98.00 or 515.51.15.55
                              

Please try this trick less than 1 Rs so as to avoid any balace deduction. If you Are facing any turbulance contact immediately.

IDEA JULY 2013 3G HACK


IDEA JULY 2013 3G HACK AGAIN
THIS TRICK IS VERY EASY YOU CAN EVEN MAKE YOUR OWN TRICK BY CHANGING IP ADDRESS OR PORT VIA WEB SUFFERING.

Just follow the steps carefully, I have seen many user’s just don’t read the Proper Steps and They comment with any silly issues Such Unusual Comments are automatically Deleted from Trickmad.blogspot.in, Lets see the method to Connect with Idea 3G Trick

    # You need to Install Proxifier for making this trick Work

    # Download proxifier

    # Connect with APN as Mobile

    # Run Proxifier

    # Put the Proxy Settings in proxifier by Going to options>proxy settings>add : 5.9.236.123 , port 443, https>ok

    # Now the next part, add another proxy by again clicking add, this establishes a proxy chain. these are the proxies you may use.use one of these proxies.

5.9.236.123   port 443
207.182.146.249  port 443
198.27.96.41 port 443
198.27.97.120   port 443
200.88.126.25   port 443
93.100.152.70 port 443
84.38.68.107 port 443

If one doesn’t work go for another one. if u get an error in opening page try two or three time before trying another proxy, because as i told you browsing is slow during day. but once a download starts there no issue.
IF YOU SUFFER ANY PROBLEM THEN COMMENT OVER HERE..

AIRTEL 3G HACK JULY 2013


WELCOME BACK TO TRICKING ZONE 

HERE IS THE NEW TRICK TO HACK AIRTEL 3G
STEPS ARE GIVEN BELOW

# Works with NMD VPN.
# HTTP and HTTPS Protocol Supported.
#NO Ads while using this VPN.
# Parallel Download Supported via IDM.
# Torrentz Supported.
# Can be Stream YouTube Videos.
# No Disconnection Issuse.

Things Required To Make It Works

First of all you need to register on Kebrum site @ https://kebrum.com/en/ for username and password , if you already registered on Kebrum just skip this step.

After that download  NMD VPN

Download Kebrum VPN config file.

# After installing NMD VPN , extract Config File and paste it in C:\Program Files\NMDVPN\config
# Just Put your Kebrum Username and Password in passkebrum.txt which you'll found in Kebrum folder.
# Now Connect with the given config connection will be established instantly n enjoy....

HERE IS THE PROFF


Note : Windows 7 and Windows 8 users must run NMD VPN GUI as Administrator to avoid route.exe problem.

For any Problem Plz comment here........

AIRTEL 3G JUNE 2013 VPN HACK


Unlimited Downloads

Works on 2g and 3g

Works on mobile and PC

Works in blocked sim and unblock sim

No disconnection Problems

Supports Torrent

No Registration Required

No speed capping Problem

No balance deduction

Works in 0 balance

Based on udp and tcp ports
Tcp speed - 300 kbps & Udp speed - 800 kbps
Three different tricks with three Amazing Vpn (Proxy, NMD & High speed
Proxy)

Works in all over India

NMD VPN + PD PROXY + HIGH SPEED PROXY SUPPORTED

So hurry Up friends grab this trick before it get banned!

UPDATED AND WORKING AS ON 23 ST APRIL 2013
THERE IS A TUTORIAL FILE ON THE ZIP ARCHIVE. FOLLOW STEP BY STEP
CAREFULLY...

It is always better to Try new and Exciting TriIt cks and to Feel Happy when it
works without any Problems, we are Sharing new Tricks on Daily basis, all
Tricks are genuine and Tested by Us.

1. NMD VPN (click here.)

2. Modified config file(click here)

    NO SURVEY REQUIRED DIRECT DOWNLOAD

E-MAIL REQUESTING COMMENTS WILL NOT BE ENTERTAINED AS I HAVE
GIVEN ALL THE POSSIBLE WAYS TO GET THIS TRICK. - -GOOD THINGS
DONT COME EASY NOR LAST FOR EVER, SO GRAB THIS TRICK BEFORE IT
GET BANNED.

If you are facing any problem please comment here :-

IDEA 2013 JUNE BROWSING TRICK

Thats the free internet with idea 2013 proxy,
it is the latest free gprs idea with highspeed
downloading and browsing supported. You have
to create setting in your mobile where you put
the proxy address and port. Make your
account balance less than Rs 1 to avoid any
cut in balance.
Basically this works fine with 3G mobiles,
Create your mobile new setting and Change
setting as
Setting Name : op blogs
Access Point : airtelgprs.com
Proxy : 128.57.41.142
Port : 80
After applying setting restart your
mobile,Enjoy free surfing and downloading.
Thats it. Enjoy!

BALANCE TRANSFER TRICK

Balance Transfer tricks always be very useful
when you don't have option to recharge. If
you transfer balance through different
cellular networks, it will deduct some rs bt
transfer your whole amout which you want to
deliver. I m here posting how you can
transfer balance in same cellular networks.
Airtel Balance Transfer Tricks
Dial *141# from you mobile and choose share
balance option. Enter your amounts and mobile
no whom you deliver.
Aircel Balance Transfer Tricks
Dial *122*666# menu will display choose your
best option . You able to transfer Rs 10, 20
and 100 balance.
Vodafone Balance Transfer Tricks
Dial *131*amount*mobileno# . Follow this
pattern to transferring like for Rs 100
*133*100*9910223344. It will delivered Rs 100
to mobile no 9910223344.
Tata Docomo Balance Transfer Tricks
Just Send SMS BT MobileNo Amount and
send to 54321 . for ex- BT 7810663377 50.
Idea Balance Transfer Tricks
Type SMS GIVE MobileNo Amount and send
to 55567. for ex- GIVE 7834562233 25

RELIANCE 2G 3G JUNE JULY 2013 FREE BROWSING TRICK

this back query both work in uc web handler and opera mini handler. this back
query trick very fine work in window phone and java mobile. this proxy also
use in pc with vnap booster.
features of reliance unlimited internet with back query june 2013
access unlimited internet
high speed downloading and surfing
work 3g or 2g mode
work all leading mobile handset
idm support
use in o balance
config. reliance unlimited internet with back query june 2013
first create new profile
name ------In
apn -------- rcomwap
proxy------ blenck
port -------- blenk
home page ------ working url in your area ( start with http:// )
save and download any handler ( download handler my another front
query post )
install handler
and change primary server--- server4.operamini.com:80 to http://
server4.operamini.com:80/?id= reliance.sportal.co.in
and same change is secondary server
and done use with rcomwap apn

Airtel free browsing june 2013

features of new airtel front proxy
this is front proxy very fresh and based in basic front proxy. this proxy
give you very high speed download and free web surfing. this front
query also use in airtel 3g or 4g internet connection. so this proxy give
you 960kbps in airtel 3g circle. and other as like it. this proxy also use
any mobile handler software. like operamini and uc web. this proxy very
fine work in raj. as my nokia lumia window mobile handset.
config. airtel mobile setting for your android and other mobile handset
download any handler software ( install in my other front query post)
make gprs setting in your 3g supported mobile
apn------ airtelgprs.com
prooxy----- 74.223.216.77
port--------- 80
install handler software
and put the below front query proxy
http://121.241.248.6/track.pl/000000a/http://
now save and restart your mobile
done enjoy airtel free and blasting speed in your mobile

AIRTEL 3G 2013 JUNE HACK


This Trick Is 100% Working In Tamilnadu.This Proxy Is Also Working In Pc.In My Experience This IS The Fastest 2G Proxy Ever In Airtel Pc Tricks History.
Just Follow The Below Steps To Get Free Gprs And 3G In Airtel Sim.

Airtel Highspeed Proxy Trick : 

Step 1 : Create A New GPRS Profile

Step 2 : Put Proxy Settings As Like Below

Proxy : 12345proxy.com
Port : 80
Apn : Airtelgprs.com
Home Page : Free Page In Your Area Like 122.170.122.214 Or Else

Step 3 : Save The Settings And Restart Your Mobile.Open Home Page And Enjoy Free Gprs Trick On Airtel.

TRICK TO SHARE APK, ZIP OR PDF ON WATSAPP.

WhatsApp is not anonymous to
anyone. Whether it’s you or me, no one
can spend even few hours without using
this amazing instant messaging
client. Apart from live chat, mesmerising
features like sharing media and other data
are key features that allows WhatsApp
to hold number of users with it. But,
some or the other day, we all got struck
into an awkward situation where we have
to share PDF, apk or zip files on
WhatApp and later we realize that there’s
no provision of sharing these file types on
this amazing messenger. For this purpose
only, at GizmoStorm , we are here with
“How to share PDF, apk and zip files on
WhatsApp messenger .

*Before you begin, you need :
An Android device running froyo 2.2
or higher version.


#Dropbox app

#CloudSend app

CloudSend is a file sharing app that
let’s you to share any type of file on
WhatsApp or any other messaging
client. For now, CloudSend is only
compatible with Dropbox for sharing
files. So, before moving further, make
sure Dropbox is installed on your
Android device and you are logged-in to
your Dropbox account.

*How to setup file sharing on
WhatsApp :

●Done with
installing Dropbox and CloudSend on
your Android device? If yes, proceed
further.

●Now open CloudSend app from app
drawer. You’ll be redirected to
CloudSend’s introductory notes, simply
swipe left to move onto the screen
prompting you to click Setup . (see image
1 below)

●Next, CloudSend will ask you to link it
with your Dropbox account. Without any
hassle, allow it. (See image 2 below)


●Now you have completely setup the
sharing process.


Initial set up process will turn out to be
cumbersome for users, but it’s just a
one time setup. After that, it’ll be as
easy as sharing any other media on the
go. Moreover, if you are concerned
about your Dropbox data security, then
don’t worry, as CloudSend will not
access any other folder on your Dropbox
account. It’ll create it’s own new folder
named as CloudSend.
*How to share files on WhatsApp :

●Navigate to the file you wish to share
with your friends.

●Long tap on the file and chose share
option. Share it with CloudSend. (See
image 1 below)

●CloudSend will upload the selected file
on Dropbox. Wait for the upload process.
As soon as upload completes, you’ll get
the notification on the notification panel.
This notification is containing the sharing
link. (See image 2 below)


●Press the notification and you’ll be
prompted to share file link via option.
Share it via WhatsApp or any other
messaging client with the person you
wish to share the file with.

●Now, you are all set to share any file
whether it’s PDF or apk, no matter which
messaging client you are using, it’s just as
easy as sharing any other media.


TRICK TO RUN MULTIPLE WATSAPP ACCOUNT

Although everything is quite handy in
WhatsApp, but if you are a dual SIM
Android user, you might be willing to
enjoy two different WhatsApp account for
your two different numbers on your
Android. Isn’t it? Earlier it seemed to be a
very difficult task, but later or sooner, we
are here with “How to run multiple
WhatsApp account on your Android” :
*Before you begin, you need :
●A rooted Android device.
●SwitchMe multiple accounts app for
your rooted Android (Play Store link).
SwitchMe allows you to log in and out of
multiple user spaces just as you would on
a desktop computer, with each account
having its own system settings, apps and
data.
●WhatsApp for your device (Play Store
link).
●Make sure you have plenty of space on
your device SD card and Phone memory.
Note: Do this at your own risk. You are
doing this because you want to do this.
Neither me nor the developer is
responsible if anything happens to your
device as running rooted Android apps is
always subjected to risk factors. Although
this trick worked on my Xperia
successfully. Don’t forget to take
Nandroid backup in case anything goes
wrong.
*How to run multiple WhatsApp
account on your Android :
●Done with Installing SwitchMe app? If
yes, follow the steps provided below.
●Open the SwitchMe app and create two
different user profiles for running two
different WhatsApp account. These user
profiles will have their own own system
settings, apps and data.
●The First user profile you created will
work as an Administrator and this account
will contain all the apps and data that you
are having now. You will be having
WhatsApp on this profile if you are using
it on your device earlier.
●The second user profile is the new one,
and will contain your Another WhatsApp
account.
Switch to this account—> Set up your
phone for this account—> Open Play
Store—> Install WhatsApp.
●Now, register WhatsApp for your
second SIM in this profile. Done?
Congratulations! You successfully
activated multiple WhatsApp account on
your Android.
Though you cannot run both profiles
simultaneously, so it’s obvious running
two WhatsApp account simultaneously is
not possible with this trick. But more or
less, you can run multiple WhatsApp
account on your Android now

TRICK TO SPY SOMEONE ELSE WATSAPP ACCOUNT.

Each WhatsApp account is associated with
unique MAC(Media access control)
address . If any one changes his/her
device(MAC address also changes), they
are requested to re-verify their WhatsApp
account. Means you cannot access same
WhatsApp account from two devices. But
what if you got success in having same
MAC address for two devices? You can
certainly access same WhatsApp ID from
two devices that will help you to have a
close look on your friends WhatsApp
activity. Without wasting any time, lets
head over to “How to spy on someone
else WhatsApp account from your
Android” :
*Before you begin, you need :
●Rooted Android device so that BusyBox
can be installed. If you don’t have rooted
device, here’s how to install BusyBox on
Non-rooted Android.
For starters, busybox allows you to use
additional linux
commands. BusyBox provides several
stripped-down Unix tools in a
single executable file.
●Terminal app on your Android to write
additional Linux Commands.
●Access to Victims phone for couple of
minutes.
*How to spy on someone else
WhatsApp :
●First, uninstall WhatsApp from your
phone.
●Now you need to have the victim
phone’s MAC address. Different OS have
different way of finding MAC address.
Here’s how to find victims MAC address :
For Android -
Head over to settings—> About phone—>
Status—> Wi-Fi MAC address.
For iPhone -
Head over to Settings—> General—> About
—> Wi-Fi address.
For Windows Phone -
Head over to Settings—> About—> More
info—> MAC address.
For BlackBerry -
Head over to options—> Device—> Device
and Status info—> WLAN MAC.
Done with installing terminal app and
BusyBox on your Android? If yes, open
Terminal app from your Android and
follow the instructions for spoofing the
MAC address provided in the link . If you
followed the steps successfully, you will
certainly end up with a spoofed MAC
address.
Now reinstall WhatsApp on your phone,
enter victims phone number and verify
your account by entering the verification
code received on victim’s phone.
Now you can completely spy on victims
WhatsApp ID.


TRICK TO CREATE FAKE WATSAPP CONVERSATION ON ANDROID.

WhatsApp is now part and parcel of
everybody’s life. Whether it’s you or me,
no one can spend even few hours without
using this amazing instant messaging
client. Apart from live chat, mesmerising
features like sharing media and other data
are key features that allows WhatsApp
to hold number of users with it. Forget
everything for now and think deeply
about your naughty side. Now, take a
deep breath and answer a simple
question, have you ever thought to
create fake WhatsApp conversation that
never existed? Probably yes. Isn’t it?
Now easily Prank your friends by
making up your own WhatsApp
conversations and share them with all
your friends to see their reaction.
First of all you need :-
An Android device running ICS 4.0 or
higher version.
Whatsaid app in android device.
*Things to remember while using
this app :
#You can change the chat background by
just tapping the conversation screen.
For inserting the victims profile picture,
simply tap the profile picture space.
#You can change the chat’s date and
time easily by just pressing the message
time stamp.
This is one of the most funniest app I have
ever encountered. Neither you, nor the
victim can tell about the fallacy of the
chat. Isn’t it cool?

ANDROID TIPS N TRICKS FOR JELLY BEAN

1) Force Reboot:-
Several times in the android users in the
event of your Android phone is frozen, you
can reboot using an Android trick, the
freezing of the mobile phone experience a
problem.
Just press the volume key + Home Button +
Power button at the same time.
2) Quick access to Google:-
The Internet is primarily built for the Android
phones, android users, many Android phones in
just a single click we can access Google
search did not provide a way. The trick to use
android,
Press the Menu key and hold it for a couple
of seconds, it will launch Google search.
3) Android restart in Safe Mode:-
Such as computers, we can reboot in safe
mode in Android phones. The latest android
jelly bean version if something goes wrong,
which provides an option to reboot in safe
mode.
On your Android reboot in safe mode, follow
the instructions given below.
* Long press the power button
* Long press on the selection of power.
We have an Android phone android phone and
restart in safe mode, then disabled all 3rd
party applications, reboot in safe mode will
show a confirmation message. We usually
restart my phone to re-enable these
applications. 3rd-party application that may
be a problem for you when you want to, in this
case, to a great android and you want to hunt.
4) The face recognition unlock Android
phones:-
In this version, you jelly bean, face
recognition can unlock your phone by using the
plot to cool android, android Android phone,
this feature is more secure unlock using face
recognition offers a way by which, added to
the jelly bean version, we have to unlock the
phone, such as the face, such as eyes that
blink android phone to unlock only when there
is enough for another layer of protection.
Sparkling eyes, and it is a live person using an
unlocked position, not an illegal attempt
android notifies the security system.
To activate this,
Settings> Security> Screen Lock> Go to Face
Unlock.
5) Get detailed information about the phone:-
We just # * # ** # * # 4636 dial phone
information, battery information, usage
statistics and WiFi information can be
obtained as the detailed statistics
On the use of the battery, DNS check, ping,
time of application to get details about an
easy-to-use time and is USSD.
6) SD card android apps Move:-
Android apps installed on the SD card is a
good idea, but what if you want to install apps
on your phone's memory. Android phones,
which we offer a way to move apps to SD
card, do not worry. Apps to SD card, follow
these steps:
Go to Settings> Application Settings> Manage
applications> Select the application, you can
select the "SD card" Move to see.
7) Hard reset and factory reset your Android
phone:-
This comes in handy when selling Android
phone android trick. Android phones can be
formatted in two ways:
Factory reset
Hard Reset
A) Factory Reset: Factory reset, in the
format that your phone is factory level. Go
through all of the default settings and all
data will be deleted, meaning the interior.
Factory reset the phone, dial * # * # 7780 #
* # *.
B) Hard Reset: Hard phone, dial * 2767 * 3855
# to reset all data (including internal and
external SD data), as well as eliminating the
Android phone settings. If you are not sure,
the purpose is not to try to test the code. It
will not ask for a confirmation.
8) android in the context menu:-
Long press on the screen, Android phones, you
can customize additional options will show. This
is somewhat similar to the menu on the right-
click context menu is the most operating
systems.
9) on the android phone for taking screen
shots:-
Android phones we could take a screen shot
without using any 3rd party application that
provides a great feature. However, another
version of the screenshot android tricks are
an android version.
Press the Home button + Power button (this
trick to work on most Android phones.)
For Galaxy Nexus: Power Button + Volume
Down button.
Swipe the screen to take a screen shot of
your palm: for the Galaxy Note 2 and S3.
10) Android Version animation:-
This is another cool android plot to play with
your Android phone.
The trick to use android, go to Settings>
Phone> Tab repeatedly about the 'Android
version' on.
After some time, Android version will be shot.
If you are a jelly bean android user, then you
can check out the tricks of the jelly bean
android users 5 secret
On Android tricks you to think, kindly
comment in the box below for your valuable
comment.
AND MORE AND MORE TRUCKS HERE ABOUT
ANDROID
Google has now jelly bean is one of the main
highlights - Android OS update's growing;
customers at the right time to provide the
required information and search for
information in an attempt to save them,
especially at the last moment. Now that
Google started as soon as you (or you're
using other apps) can use it right from the
home page.
Trick: (with the logo printed on it), pop out of
the semi-circles with a white long-press the
home page, which prompts you to enter. Drag
your finger on the side of the logo and voila!
Google has now launch almost immediately!
Tip: Alternatively, you can also return to the
main page applications DRAWER button or
press the button, and the same action (Google
logo on the side of your finger and drag it)
again.
Jelly bean of Android is a trademark slide
down the notification bar. Quick warnings,
with the selection, deployment, and a preview
of some of the ads - but, it has a number of
interesting changes.
Tip: You can also just swipe sideways, then, a
statement from time to time in the
notification bar does not want to be bugged,
and you will be able to relax a specific ad,
and if you continue to work.
Face unlock your mobile devices, more and
more Android devices in terms of the
individual making one of the best things to
do. Jelly Bean Face Unlock feature 'Liveness
check' adds the option. Now, unlock your
device, you do not have to deal with only a
camera, but also the 'blink'. It is a static
photo of the owner to unlock it who can unlock
the device by holding the true owner, and an
imposter, will testify. Now this I call a good
safety feature!
Tip: In case the Face Unlock feature because
it fails to detect a blink, alternatively, set an
unlock pattern, you can always design (set)
can be used to unlock your device.
Taking screenshots in a jiffy
Jelly bean rooting your device, or download
and use without the need for third-party
applications on the activity has a built in
screen.
Trick: If you want to take a screenshot, only
the 'volume down' button and the 'power
buttons' together and taking a snapshot of
the screen on your device (in your ads), you
will be notified. After this, you can easily
edit and even share the screen.
Deleting an application for Android devices, it
editable and then appeared on the screen, the
'trash bin' to the drag the icon has become a
symbol of long-users need to press. Not
anymore!
Trick: If you need to remove your device
from any application, just long press and then
throwing it up. If you were to take this action,
your application will be deleted.
With Google has now - jelly bean is one of the
most prominent features of the text-to-
speech feature that has become more and
more powerful. If you wish to use this
feature, however, then you can turn off this
feature only.
Tip: Settings> language and input> Voice
Search> Go to the speech output. 'Speech
Output' option (only available in hands-free
mode) Toggling you, or text-to-speech
feature allows off on.
Confirmed
This is an Android Jelly Bean on the device
you want to use the basic tips, some. You can
also search for various websites, more and
more of these tips and tricks and use them.

ANDROID TIPS.

1. Get Some Widgets,
Organize Your Home
Screen
Widgets are an easy to way to put
information and quick commands front-
and-center on your phone. Here’s my
most recent list of favorites , and here’s
another list for good measure. On most
newer phones, you can add widgets by
going to the main app launcher, then
swiping over to the widgets section.
Some phones let you add widgets by
holding your finger down on a blank part
of the home screen.
Once you’ve got a solid collection, try to
organize them in a logical way. For
example, my main screen has just the
weather, favorite apps and a fast way to
reach my wife (more on that next). Then
I have one screen for quick actions like
note-taking, bookmarks and navigation
shortcuts, one for news and information
and another for phone settings.

2. Give Yourself a
Spouse/Significant
Other/BFF Button
I want to give special attention to
Android’s built-in 1-by-1 Contact widget
(or the “wife button,” as I call it), which
serves as a command center for talking to
that special someone in your life. Add it
to your home screen, and with two taps
you’ll be able to call, send a text message
or write an e-mail. (Update: Some HTC
phones, such as the HTC One, only
include a 4-by-4 Contact widget.
But there is another way: Press and hold
down on your home screen, and you
should see a drop-down list with
“Widgets” as the default option. Change
this to “Shortcuts,” then select “Person,”
and select the contact you want to add.)

3. Set Up Google
Play to Stream Your
Music Collection
Just because your music collections is in
iTunes doesn’t mean you can’t have your
songs on Android. To bring music songs
over from iTunes, you could use an app
like DoubleTwist, but I prefer streaming
my music from Google Play, freeing up
space on the phone for more photos,
videos and apps.
Just install the Music Manager software
on your computer, and tell it where your
music library is located. The software will
match your collection to Google’s own
library for free (similar to iTunes Match ),
and will upload any songs it can’t match.
Then, you can use the Google Play Music
app for Android to play your songs. The
app can also download albums and
playlists for offline listening.

4. Use the Google Play Website
to Install Apps Remotely
The next time you find a good Android
app suggestion on the web (here are 25 of
them), don’t bother taking out your
phone to download them. As long as you
have visited Google Play on your phone
before, and have connected your Google
account, you can remotely install apps
through the Google Play website . Just
click the blue “Install” or “Buy” button on
any app page, then select your device
from the drop-down list. The app should
appear on your phone shortly thereafter.


5. Set Your Apps
to Update
Automatically
Keeping your apps up to date on other
platforms can be a hassle, but on
Android, you can set apps to update
automatically. Just go to the Google Play
app, hit your menu button, and go to
Settings, then check the box for “Auto-
update apps.” You may also want to
check the “Update over Wi-Fi only” box
to avoid going over your cellular data
cap. Keep in mind that if an app changes
its privacy permissions, you’ll still have
to update it manually
.
6.Get a Gesture Keyboard
On Android, you are not
bound to the software
keyboard that comes
with your phone. If you aren’t using a
gesture keyboard, like Swype or SwiftKey
Flow, you’re missing out. Check out this
video of how gesture typing works, then
spend a solid week or two giving it a try.
Once you get used to it, you’ll never want
to go back.
You’ve got a few options for gesture
typing on Android. It’s possible that your
phone may have a gesture keyboard
included, but the quality of these versions
can vary. Your best options are to
buy SwiftKey ($4, or free trial) and
enable Flow after installation, or buy
Swype ($1, or free trial). Both apps will
walk you through the setup process when
you open them for the first time.

7. Set Up Google
Now
Google Now is a virtual
assistant built into newer Android
phones. It attempts to provide
information automatically based on
where your are, what you search for and
other information. For example, if you’re
at a train station, it will alert you to
when the next train arrives. And once it
figures out where you work and live
(based on the phone’s location), it can
warn you about traffic on your commute.
It can also hook into Gmail to provide
information on flights, track inbound
packages and remind you of upcoming
events.
To enable Google Now, open up the
Google Search app and go into settings.
Flip on the switch for “Google Now” to
on. You can also tap the the Google Now
line in settings for more options, allowing
you to fine-tune the types of information
that show up.

8. Download Chrome
(If You Don’t Have
It)
Even though Chrome is technically the
default browser for Android, some phone
makers have deluded themselves into
thinking their own browsers are better.
Don’t believe it. Chrome is fast and
simple, and if you use Chrome on your
computer, the mobile app will
automatically keep your bookmarks in
sync.
If your phone doesn’t come with Chrome,
pick it up from the Google Play store.
Occasionally, you’ll see a prompt to
choose which browser to use (for
instance, when opening a link through
Twitter). Whenver this happens, select
Chrome and hit “Always,” and you’ll
never have to deal with an inferior
browser again.

9. Get Text Messages on Your
Computer
On Android, several third-party apps will
allow you to read and respond to text
messages from your computer or tablet,
using your existing phone number. I
rounded up a few of them in an older
post, but my favorite is MightyText. Just
install the app on your phone, then
follow the instructions on MightyText’s
website to access your text messages on
your desktop browser or your tablet.


10. Get Comfortable with
“Share”
In certain apps, you might notice
an icon resembling a “V” or a “<”
character, sometimes with arrows
pointing outward. This is the Share
button, and it’s designed to let any two
apps on your phone communicate with
each other.
For instance, the Share button will let
send interesting web links directly to
your social networking app of choice. If
you’ve written something in text editor,
the Share button will let you send those
notes by e-mail or save them to Dropbox.
If you have a read-it-later app like
Pocket , the Share button lets you save
articles without ever leaving the app
you’re in. Get comfortable with the Share
button and you’ll save yourself lots of
time.

11. Download Maps
for Offline Use
Internet connections fail.
Mobile networks get congested. But you
don’t want that to happen when you’re
relying on GPS navigation for directions.
Go into Maps on your phone, hit the
menu button, and select “Make available
offline.” Pinch or zoom to select the map
area you want to download, then press
“Done.” You should store a map for
where you live, and store some more
before you travel. Even if you don’t have
a data connection, you’ll be able to see
your GPS location marker in Google
Maps, so this trick is especially helpful
for navigating a foreign country without
a data plan.

12. Connect to a PC for Fast
Photo Transfers
One nice thing about
Android is that you’re not
locked into a program
like iTunes for moving
files on and off the
phone. On the downside, transferring
photos or other files requires just a little
more know-how.
After plugging your phone into a PC’s
USB port, look for it in your computer’s
file browser. You’ll likely see a folder
called “Internal Storage.” Click on that,
then look for the folder called “DCIM.”
You’ll find all your photos in here,
possibly in another folder called
“Camera” or something similar. Mac
users, note that you’ll need extra Android
File Transfer software to make this work.
Alternatively, when you plug in the
phone, look for a notification on your
phone that says you’re connected by USB.
Tap on this notification, and select the
option to connect as Camera (or PTP).
This is a good option for Mac users who
just want to get to their photos, rather
than the entire Android file system.

13. Take
Advantage of
Refunds
Any time you pay for an Android app, you
have 15 minutes to try it out and get your
money back if you’re not satisfied. That’s
not a lot of time, but it’s enough to poke
around the app and make sure it suits
your needs. Being able to get a refund is
especially useful if you’re looking for
something specific, and the app’s
description doesn’t tell you exactly what
you need to know. It’s also a lifesaver if
the app doesn’t work with your phone
for any reason.
To get the refund, just go back to the
app’s page in Google Play. As long as you
bought the app within 15 minutes, you’ll
see a “refund” button. The app will
uninstall, and you’ll get your money back.


ANDROID SECRET CODES.


THESE CODES ARE USE BY TECHNIQUES SO PLEASE USE AT YOUR OWN RISK.
GENERAL CODES:-
*#06# – Display's IMEI number.
*2767*3855# – This code will Format your
device to factory state (will delete
everything on phone).
*#*#4636#*#* – Display's Phone
information, usage statistics and battery.
*#*#273282*255*663282*#*#* – This code
will Immediately backup of all media files.
*#*#197328640#*#* – This code will Enable
test mode for service.
*#*#1111#*#* – Will display FTA software
version.
*#*#1234#*#* – Will show PDA and firmware
version.
*#*#232339#*#* – Wireless LAN tests.
*#*#0842#*#* – This code is used for
Backlight/vibration test.
*#12580*369# – Display's Software and
hardware info.
*#*#2664#*#* – This code is used for
Testing the touchscreen.
*#9900# – System dump mode.
*#9090# – Diagnostic configuration.
*#*#34971539#*#* – Will display Detailed
camera information.
*#872564# – USB logging control.
*#301279# – HSDPA/HSUPA Control Menu.
*#7465625# – This code will display phone's
lock status.
*#0*# – Enter the service menu on newer
phones like Galaxy S III.
*#*#7780#*#* – Reset the /data partition
to factory state.
BASIC CODES:-
*#*#7780#*#* - This code is used for
factory restore setting.This will remove
Google account setting and System and
application data and settings.
*2767*3855# - This code is used for
factory format, and will remove all files and
settings including the internal memory
storage. It will also re install the firmware.
*#*#4636#*#* - This code show
information about your phone and battery.
*#*#273283*255*663282*#*#* - This code
opens a File copy screen where you can
backup your media files e.g. Images, Sound,
Video and Voice memo.
*#*#197328640#*#* - This code can be
used to enter into Service mode. You can run
various tests and change settings in the
service mode.
*#*#7594#*#* - This code enable your
"End call / Power" button into direct power
off button without asking for selecting any
option(silent mode, aero plane and power-
off).
*#*#8255#*#* - This code can be used to
launch G Talk Service Monitor.
*#*#34971539#*#* - This code is used to
get camera information. Please avoid update
camera firmware option.
WIFI, BLUETOOTH AND GPR CODES:-
*#*#232339#*#* OR *#*#526#*#* OR
*#*#528#*#* - W-LAN test (Use “Menu”
button to start various tests).
*#*#232338#*#* - Shows WiFi MAC
address.
*#*#1472365#*#* - GPS test.
*#*#1575#*#* - Another GPS test.
*#*#232331#*#* - Bluetooth test.
*#*#232337#*# - Shows Bluetooth device
address.
VARIOUS TEST CODES:-
*#*#0842#*#* - Device test (Vibration
test and BackLight test).
*#*#0588#*#* - Proximity sensor test.
*#*#0*#*#* - LCD test.
*#*#2664#*#* - Touch screen test.
*#*#2663#*#* - Touch screen version.
*#*#0283#*#* - Packet Loopback.
*#*#0673#*#* OR *#*#0289#*#* -
Melody test.
*#*#3264#*#* - RAM version.
FIRMWARE VERSION INFORMATION:-
*#*#1111#*#* - FTA SW Version.
*#*#2222#*#* - FTA HW Version.
*#*#44336#*#* - PDA, Phone, CSC, Build
Time, Changelist number.
*#*#4986*2650468#*#* - PDA, Phone, H/
W, RFCallDate.
*#*#1234#*#* - PDA and Phone.

RELIANCE MAY 2013 FREE BROWSING TRICK.

RELIANCE HACK
First of all you have to download proxifier from this click here link.
After installation run proxifier,then connect your mobile internet using rcomwap as apn.
Then click on profile tab in proxifier and select proxy servers.
Click on add and enter following proxies and port one by one select HTTPS
Choose any of these proxies which is working to you.
1)  10.239.221. 5  (8080)
2)  10.239.221.22 (8080)
3)  91.201.21.170    (80)
4)  95.140.47.243    (80)
5)  216.155.153.105 (80)
After successfully connection open your browser and enjoy free browsing and downloading.


TRICK TO CALL ANYONE WITH YOUR FRIEND NUMBER.

1. Go to click here and register there for free account.

2. During registration, remember to insert Victim mobile number in "Phone number" field as shown below.


3. Complete registration and confirm your email id and then login to your account. Click on "Direct WebCall".


4. You will arrive at page shown below. In "Enter a number" box, select your country and also any mobile number(you can enter yours). Now, simply hit on "Call Now" button to call your friend with his own number.

5. That's it. Your friend will be shocked to see his own number calling him. I have spent last two days simply playing this cool mobile hack prank.